Followers

Sunday, 22 January 2017

Honey Doo Crafts Flower Fountain stamp set

Hi everyone

Wanted to share a card I made today using the following  Honey Doo Crafts products

Flower Fountain stamp set
Little Lilies stamp set

Www.honeydoocrafts.co.uk

I stamped and heat embossed the Flower Fountain in white onto white card. I matted this onto black cardstock to contrast.

I then created a random watercoloured background using distress inks adding splatters of water.

I stamped and heat embossed the Little Lilies onto vellum and adhered to card using 3d gel.

A sentiment was added, along with some pearls, to complete.  

Hope you like it and thankyou for popping by
Xx

Honey Doo Crafts Foliage Flourish stamp set

Morning crafters

Sharing another of my DT samplesamples for the Honey Doo products showcasing this Wednesday on c&c

For this sample I used
Foliage Flourish stamp set
Dream Sentiments stamp set

Www.honeydoocrafts.co.uk 


 A simple but effective CAS card using just the flourish stamp.
I blended the distress ink up from the corner of the card blank.
I then stamped the flourish randomly over the inked area using first and second generation stamping.
The sentiment was stamped in black versafine and pearls were added to complete the sample.

Saturday, 21 January 2017

Honey Doo Crafts Foliage Flourish stamp set and die

Good morning crafters

Sharing another of my DT samples for the Honey Doo products showcasing this Wednesday on c&c

I have used
Foliage Flourish stamp set and die
Little Lilies and Leaves stamp set
Dream Sentiments
Www.honeydoocrafts.co.uk 


I stamped the flourish onto kraft card using Dew drops and coloured a smaller piece of card in the same colour. These were matted onto a kraft card blank

The flourish was then stamped and heat embossed onto vellum and cut out with the matching die

The Little Lilies was stamped onto mulberry paper and heat embossed before being cut out

These were layered onto the card before stamping and matting a sentiment. Pearls were added to complete this sample.

Thanking for popping by

Crafty hugs x


Friday, 20 January 2017

Honey Doo Crafts Little Lilies and Leaves, Dream Sentiments stamp set

Morning crafters.

Sharing another of my first samples as guest designer on the Honey Doo DT.

I've used the
Little Lilies and Leaves stamp set
Dream Sentiments stamp set
Www.honeydoocrafts.co.uk

I cut the front off a card blank, leaving a strip at the top. I adhered acetate to the back of the strip to create an acetate front card blank. Using the cut off card stock,  I cut another strip and added this to the bottom of the acetate panel.

The flowers and leaves  were stamped and then coloured with Promarkers before being cut out.

These were then adhered along the top and bottom of the card strips , so they overlapped onto the acetate.

The sentiment was stamped and matted and then attached to the middle of the acetate.

Thankyou for popping by and would love you to follow my blog to see all my future design team makes, as well as my own cards and crafts.

Crafty hugs xx

Thursday, 19 January 2017

Honey Doo Crafts Foliage Flourish stamp and die, Little Lilies and Leaves stamp set

Evening everyone.

Here's my second DT sample using the following Honey Doo Crafts products

Foliage Flourish stamp set and die
Little Lilies and Leaves stamp set
Dream Sentiments stamp set

Www.honeydoocrafts.co.uk

I masked off a diagonal strip,  on kraft card and used a white dew drop ink pad to stamp the Little Lilies and Leaves 

The Foliage Flourish was stamped and heat embossed onto vellum and then cut out using the coordinating die.

Black embossing powder was used to stamp the Little Lilies onto vellum. These were then cut out and layered up to create a 3d flower.

The card was then assembled and finished off with a sentiment from the Dream Sentiments stamp set, and black pearls

I hope you like it and many thanks for popping by.

Hugs x

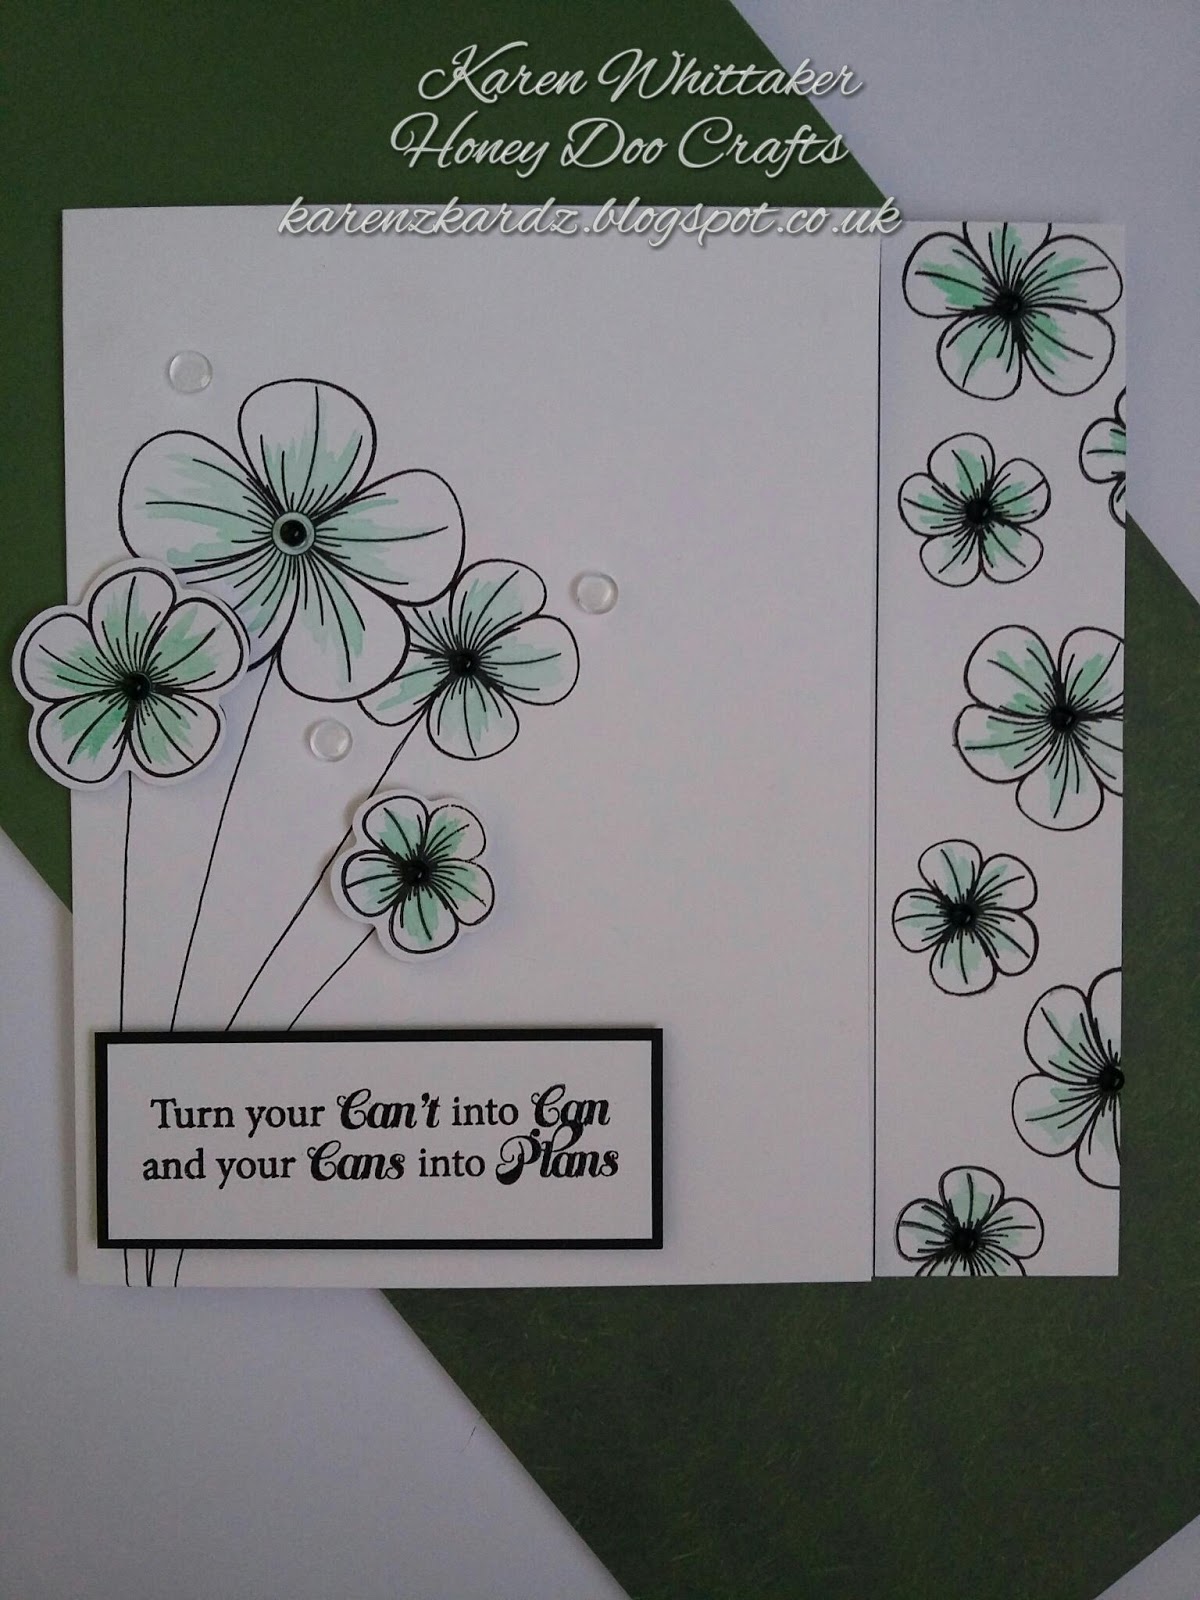
Honey Doo Crafts Trio of flowers stamp set and die

Afternoon everyone.
So excited to final share my news.  I have been invited to join the Honey Doo Crafts DT as a guest designer.  I am so honoured to work with Amanda, Martin and Kay.

Here is my very first DT sample.

I used the trio of flowers stamp set and coordinating die available from www.honeydoocrafts.co.uk

I cut off a strip on the right side of the card blank and drew two lines down the inside to create a panel.

I stamped the main images in black versafine ink and clear embossing powder.

The flowers were subtly coloured using distress ink.

I stamped and coloured two more flowers. These were cut out and glued on with 3d gel.

The sentiment was stamped and matted onto black card before mounting with 3d gel.

I hope you like my first sample and thankyou for popping by.
Crafty hugs xx

Emerald City Crafts UK Les Beaux Oiseaux collection

Morning crafters

Sharing an mdf plaque made using the beautiful Les Beaux Oiseaux papers and ephemera from Emerald City Crafts UK 

The plaque was painted lightly with gesso before adding the papers which were distressed with inks to create the shabby look

The beautiful toppers and embellishments finish off the plaque which is now hanging in my craft room

Thankyou for stopping by

Crafty hugs xx

Saturday, 14 January 2017

Emerald City Crafts UK Les Beaux Oiseaux

Evening everyone.
Wanted to share a canvas I made using products from a brand new online business Emerald City Crafts UK. 


I used the gorgeous papers and ephemera from the Les Beaux Oiseaux collection. 
The background was created using a mixture of acrylic and Dyna paints, texture paste,  distress inks and stencils.
Hope you like it and thankyou for popping by
Crafty hugs xx

Friday, 13 January 2017

Home In A Dome and Floral Sketches by For The Love of Stamps

Afternoon everyone.

This card was inspired by a demo by Anne-Marie from Hunkydory.

I used the dome stamp from Home In A Dome and a rose from the Floral Sketches stamp set.  Both are available from www.hunkydorycrafts.co.uk

The roses were stamped and heat embossed before being coloured with Dyna paints to give a beautiful sheen.

Hope you like my version and thankyou for stopping by

Hugs xx

Sunday, 8 January 2017

For The Love of Stamps Home in a Dome stamp set

Hi everyone.

Sharing my last DT sample using the gorgeous  jar/toadstool house stamp set from For The Love of Stamps by  www.hunkydorycrafts.co.uk

I stamped the jar onto a card blank, keeping the left handside near to the spine to create the card blank fold. I cut out the jar.
The jar was subtly watercoloured to create the impression of glass. The toadstool house and plant were stamped and coloured using acrylic paints. I stamped the dragonflies and sentiment in black versafine.
The grasses were stamped onto a paper from the Perfectly Natural Background paper pad and cut out before using 3d glue gel to stick onto the card 
Thankyou for taking the time to look at my blog. I love to read all your comments and hope you're happy to "follow " my blog to see all my future makes.
Crafty hugs xx

For The Love Of Stamps Blossoming Birdcage stamp set

Afternoon.  
Sharing another sample from the Blossoming Birdcage stamp set.
This is one of the new stamp sets launched this weekend  by For The Love Of Stamps by 

I stamped the small images onto patterned paper from their Backing Paper pad.
I tore the edges and attached to card blank
The birdcage was heat embossed onto vellum
The flowers were stamped and cut out before attaching to card.  A sentiment was add to complete this sample.
Thanks for popping by
Hugs xx

For the Love of Stamps Enjoy the Journey stamp set acetate card

Hi crafters

Sharing a simple acetate card using the new biplane stamp set launched  by For The Love of Stamps By www.hunkydorycrafts.co.uk

I cut off the front of the card blank leaving a small strip at the top, before attaching  acetate behind.  I then attached another strip of card at the base of the acetate panel. 
The biplanes were stamped and heat embossed onto heat resistant acetate, then set to one side
The stamps were used to add effect to the card strips at the top and bottom of the card blank, using distress inks and a water brush, to give a watercolour effect.
I cut some of the paper from a Background Paper Pad to the size of the card blank, then stamped  the clouds randomly, in a coordinating ink. This was glued to the inside of the card blank.
The acetate planes were attached across the acetate panel to complete. 
Thanks for stopping by.. would love to read yr comments.
Crafty hugs xx

For The Love of Stamps Enjoy the journey stamp set

Sharing another DT sample for the new stamps released from For The Love of Stamps By www.hunkydorycrafts.co.uk

I die cut two circles out of two pieces of layered card stock to create an enlarging aperture.
Putting these to one side I then inked a "sky" background onto the card blank, where the apertures were going to sit. I stamped the clouds and then using a water brush, I bleached some of the ink out to create the cloud effect
I stamped and heat embossed the plane and compass onto heat resistant acetate, and used the smaller stamps to embellish the front piece of card stock.  I edged all mats with gilding wax before assembling the sample. 
Thanks for stopping by
Hugs xx

For The Love of Stamps Home in a Dome stamp set

Hi crafters

Here's a candle box card I made using the cute new toadstool house stamp set from For The Love of Stamps By www.hunkydorycrafts.co.uk

Using a template from the Internet I created the tealight candle card. 
I stamped the toadstool, and small images using Versafine ink, and coloured all with distress inks to create a monochromatic effect.
This was mat and layered onto card stock before attaching to the candle card.
Thankyou for taking the time to look.
Crafty hugs
xx

For the Love of Stamps Home in a Dome and Fairy Sparkles stamp set

Hi everyone

Sharing another DT sample using the cute toadstool house stamp set from For The Love of Stamps By www.hunkydorycrafts.co.uk

The jar lid was masked off then stamped onto white card, adding a hint of blue shading.  This was placed to one side.
I created the scene using distress inks then stamped the toadstool and small embellishment stamps in versafine and coloured in using inks.
I stamped a fairy from the Fairy Sparkles stamp set (already released on a previous launch) to compete the scene, before attaching my jar to the topper as required. I trimmed off the overhang of the jar before matting and layering the topper. This was then attached to the card blank.
The sentiment was stamped, put on a mat then attached to the sample to complete this card.
Thanks for looking and please feel free to leave a comment and follow my blog.
Crafty hugs xx

For The Love of Stamps Enjoy the journey stamp set

Sharing another sample for the new biplane stamp set released by For The Love of Stamps from www.hunkydorycrafts.co.uk

I used distress inks on an acrylic block to create the background
The biplane and clouds were stamped in versafine ink and small stamps added to embellish the topper.
This was mat and layered onto mirri and black card stock then attached to the card blank
Thanks for stopping by
Hugs xx

For The Love Of Stamps Home in a Dome stamp set

Hi crafters x

Sharing another DT sample using the gorgeous new stamps and masks from For The Love of Stamps by www.hunkydorycrafts.co.uk

I created the background on watercolour card using distress inks and the mask was used to heat emboss the sentiment and leaves. This was mounted onto a card blank and a frame drawn with a fine line pen 
The  toadstool was heat embossed onto watercolour card and mounted onto foam pads and added to the card blank.
Hope you like this sample and thankyou for popping by.
Crafty hugs xx

For The Love of Stamps Blossoming Birdcage stamp set

Hi crafters

Here's another DT sample using the gorgeous new birdcage stamp set from For The Love of Stamps By www.hunkydorycrafts.co.uk

I stamped the bird and the script randomly over a paper from the Background Paper Pad.
I tore bits of paper from a book and distressed the edges with ink
The birdcage was stamped onto heat resistant acetate and gilding flakes applied to create this stunning metallic effect. The little bird was stamped, coloured in and cut out then glued to the cage with 3d gel.
The sentiment was stamped onto the paper,  then both papers were mat and layered onto gold mirri before assembling the sample.
Pearls were added to complete this sample
Thanks for stopping by
Crafty hugs xx

Saturday, 7 January 2017

For the Love of Stamps Enjoy the journey stamp set

Hi crafters x

Sharing another of my DT samples using the new stamps and masks just released by For The Love of Stamps from www.hunkydorycrafts.co.uk

I cut out all my mats out first, then made a triangular shaped mat from kraft card.
Using this I worked out where I wanted the "sun" inked, using distress inks and a circle mask.
I used the mask and embellishment stamps to create a background on the triangular card stock.
I stamped and heat embossed the biplanes onto heat resistant acetate and cut out.
I assembled all the mats and layers using foam pads to add dimension,  before adhering the biplanes with pinflair glue.
The sentiment was stamped, mat and layered and attached to complete this sample
Thanks for stopping by and feel free to follow my blog to see all my future  makes
Crafty hugs xx 

For The Love of Stamps Blossoming Birdcage stamp set

Hi
Sharing a canvas DT sample using the gorgeous birdcage stamp set just released by For The Love of Stamps by

 www.hunkydorycrafts.co.uk


I used texture paste and acrylic paints to cover the canvas before stamping the script stamp randomly all over 
The birdcage and bird were stamped onto vellum and coloured with acrylic paints, and sparkles added to accentuate the flowers, then these were attached to the canvas using 3d gel.
Flowers and leaves from the Floral Sketches stamp set ( found on Hunkydory website ) were stamped and heat embossed onto papers from the Background Paper Pads. These were glued around the birdcage
The sentiment was stamped and cut into strips, inked around the edges then glued on.
Pearls and clear gems completed the canvas.
I hope you like my work and would love you to follow my blog to see all my future makes
Hugs xx